> ## Documentation Index
> Fetch the complete documentation index at: https://docs.unleashx.ai/llms.txt
> Use this file to discover all available pages before exploring further.
# WhatsApp Business
> Send WhatsApp messages, templates, media, and voice notes to customers through the Meta WhatsApp Cloud API.
# WhatsApp Business
> **In one line:** Connect the official Meta WhatsApp Cloud API so your UnleashX agent can send text, template, image, document, audio, and video messages to your customers on WhatsApp.
| | |
| ------------------ | ----------------------------------------------------------------------------------------------------------- |
| **Category** | Communication |
| **Authentication** | OAuth / Access Token (Meta Cloud API access token + phone number ID and WABA ID) |
| **Setup time** | \~15 minutes |
| **Difficulty** | Medium |
| **Best for** | Businesses sending notifications, support replies, and template campaigns to customers on WhatsApp at scale |
## 1. Overview
WhatsApp Business (via Meta's WhatsApp Cloud API) is the official way for companies to message customers on WhatsApp — sending order updates, reminders, support replies, and approved marketing templates from a verified business number.
Once connected to UnleashX, your agent can send plain text messages, pre-approved templates (with variables), images, documents, audio/voice notes, and videos, and mark inbound messages as read — all through your own WhatsApp Business number.
Connecting this to UnleashX lets your agent automate customer communication end to end: trigger a template when an event happens, reply with a document on request, or send a voice note — using the same compliant Cloud API that Meta requires for business messaging.
## 2. What you'll need
* A **Meta for Developers** account and a **Meta App** with the **WhatsApp** product added.
* A **WhatsApp Business Account (WABA)** and a registered **business phone number**.
* Three values from the Meta dashboard: an **access token**, your **Phone Number ID**, and your **WhatsApp Business Account ID (WABA ID)**.
* Approved message **templates** if you plan to send template messages (Meta must approve these in advance).
If you don't manage the Meta App yourself, ask whoever administers your company's Meta Business / WhatsApp setup to add you as an app admin or to share the access token, Phone Number ID, and WABA ID.
## 3. Get your credentials
To connect, UnleashX needs three values from Meta: an **Access Token**, a **Phone Number ID**, and a **WhatsApp Business Account ID (WABA ID)**. Getting them means setting up the official **Meta WhatsApp Cloud API** — no Twilio, WATI, or AiSensy needed.
Already have WhatsApp Cloud API running? Skip ahead to **Step 8 — Collect your three values**. The steps below are the full setup from scratch.
### How the pieces fit together
Each thing you create unlocks the next. This is the chain you'll build:
```text theme={null}
Facebook account → Meta Developer account → Business Portfolio →
Meta App (Business) → WhatsApp product → WhatsApp Business Account (WABA) →
Phone number → Access token → (Webhook for receiving)
```
### Set it up step by step
Go to [Meta for Developers](https://developers.facebook.com) and log in with your Facebook account. Click **Get Started**, verify your email, turn on two-factor authentication if asked, and accept the developer terms. You now have a developer account.
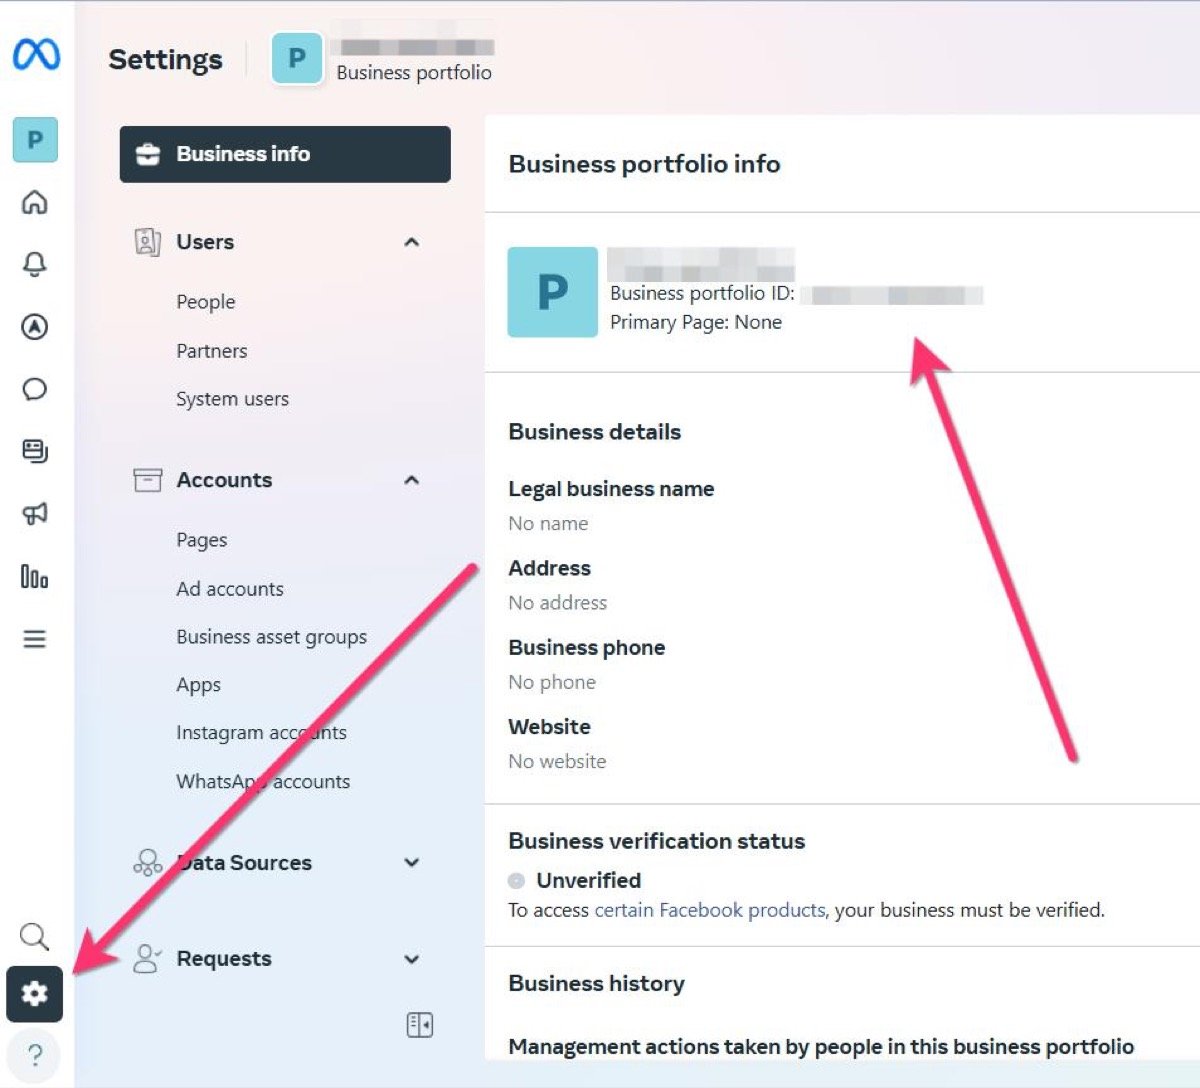
Open [Meta Business Settings](https://business.facebook.com/settings) and create your business portfolio — your **business name**, **email**, **website**, and **address**. This is the entity that will own your WhatsApp Business Account, and it has its own **Business portfolio ID**.
 In **Business Settings → Security Center**, click **Start verification** and upload your business documents (for example a registration certificate, GST certificate, or a utility bill).
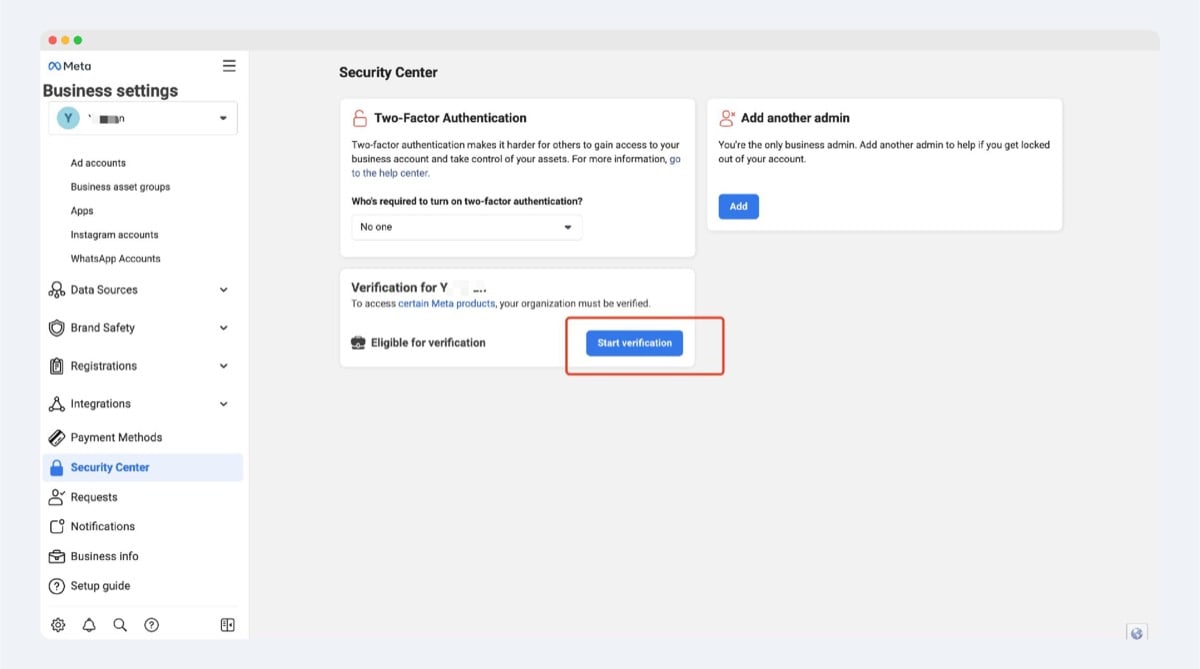 Verification isn't required to test, but it **is** required for production use and for higher messaging limits — so it's worth doing early.
Go to your [Apps dashboard](https://developers.facebook.com/apps) and click **Create App**.
Verification isn't required to test, but it **is** required for production use and for higher messaging limits — so it's worth doing early.
Go to your [Apps dashboard](https://developers.facebook.com/apps) and click **Create App**.
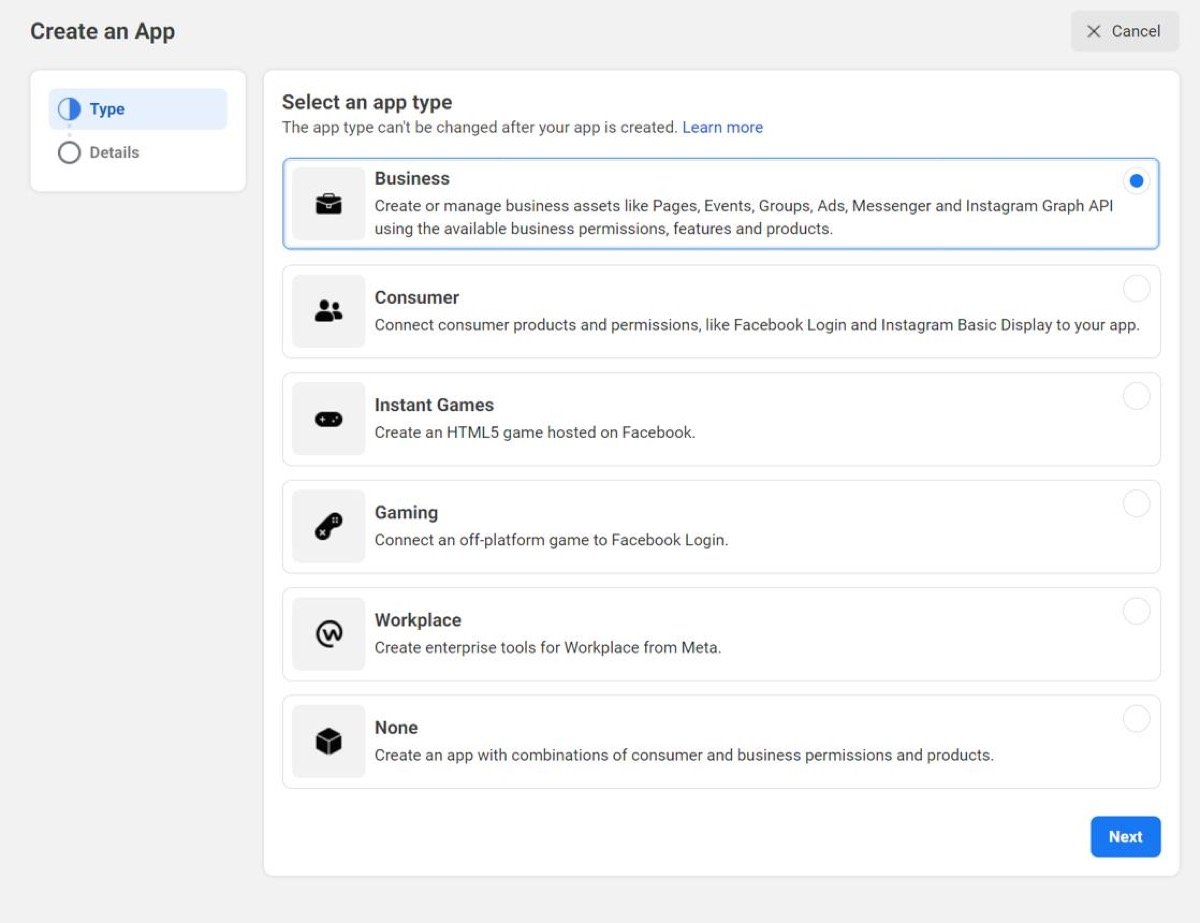
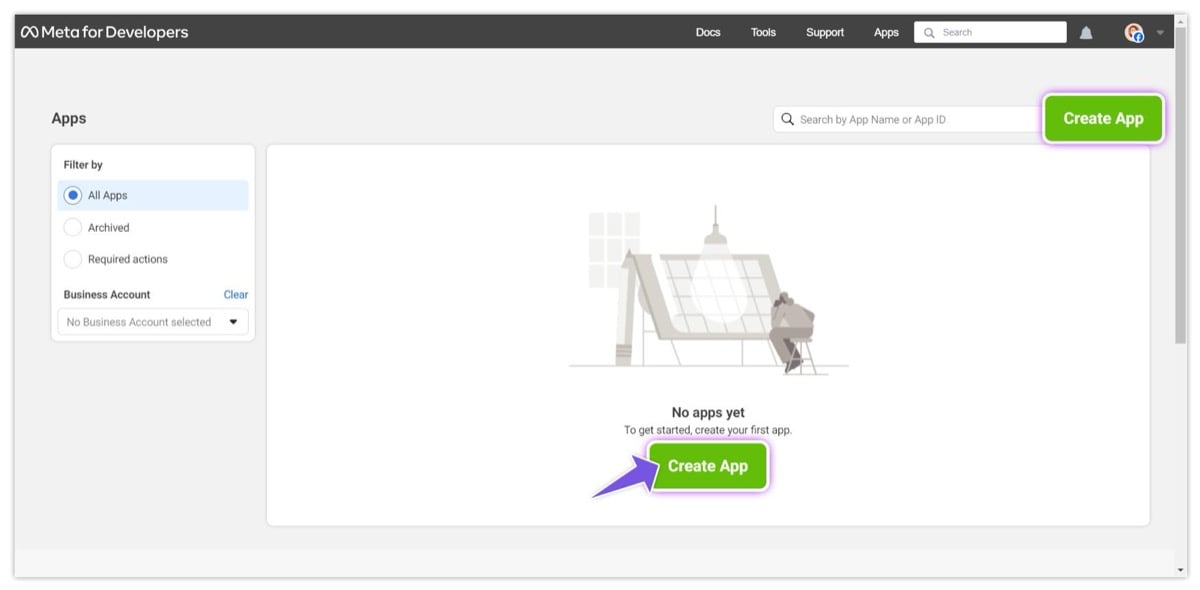 Choose the **Business** app type and click **Next**.
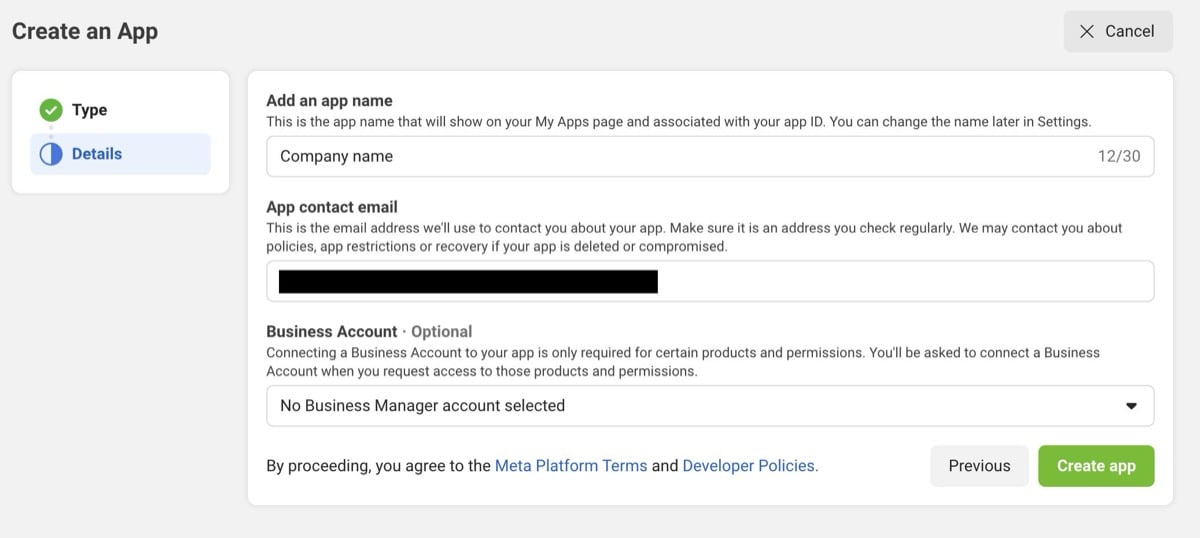
 Fill in the **App name** and **contact email** (you can attach a **Business portfolio** now or later), then click **Create app**.
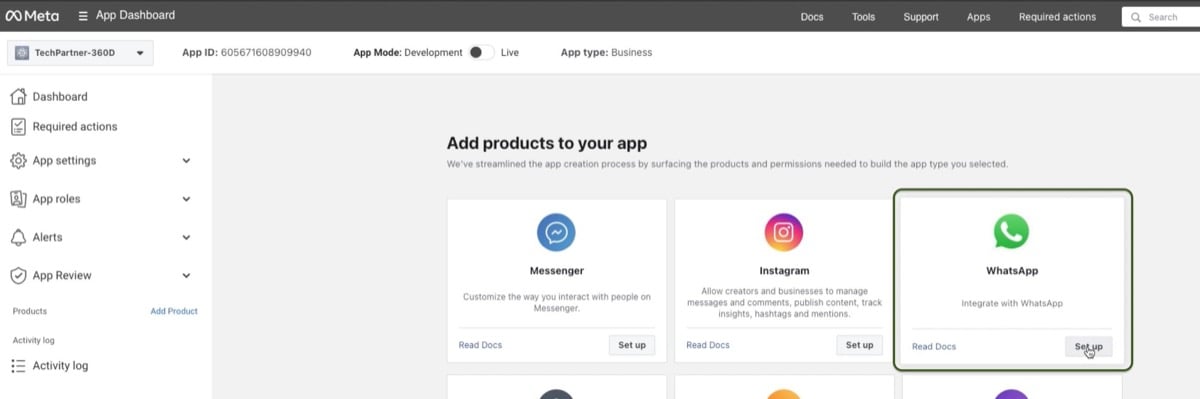
 Inside the app, find **Add Product**, locate **WhatsApp**, and click **Set up**.
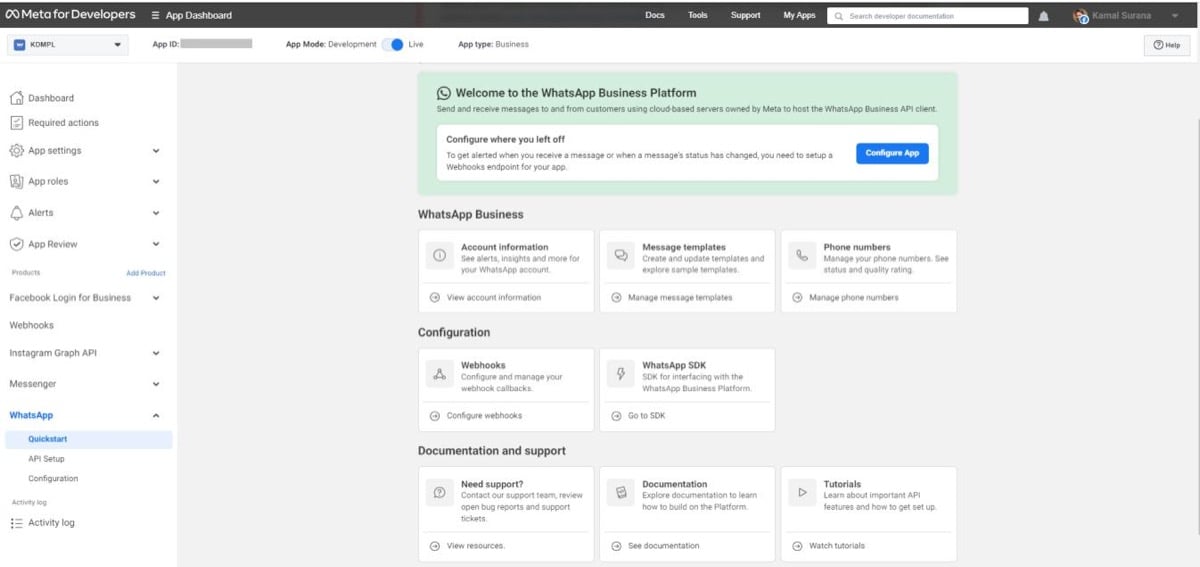
 Meta automatically gives you a **test** WhatsApp Business Account, a **test phone number**, and a **temporary access token** so you can try things immediately. You'll land on the WhatsApp **Quickstart** page.
 Want to confirm it works before going further? Open **WhatsApp → API Setup** (or **Getting Started**). It shows a **temporary access token**, your test **Phone Number ID**, and your **WhatsApp Business Account ID**, plus a ready-made `curl` command and a **Send message** button.
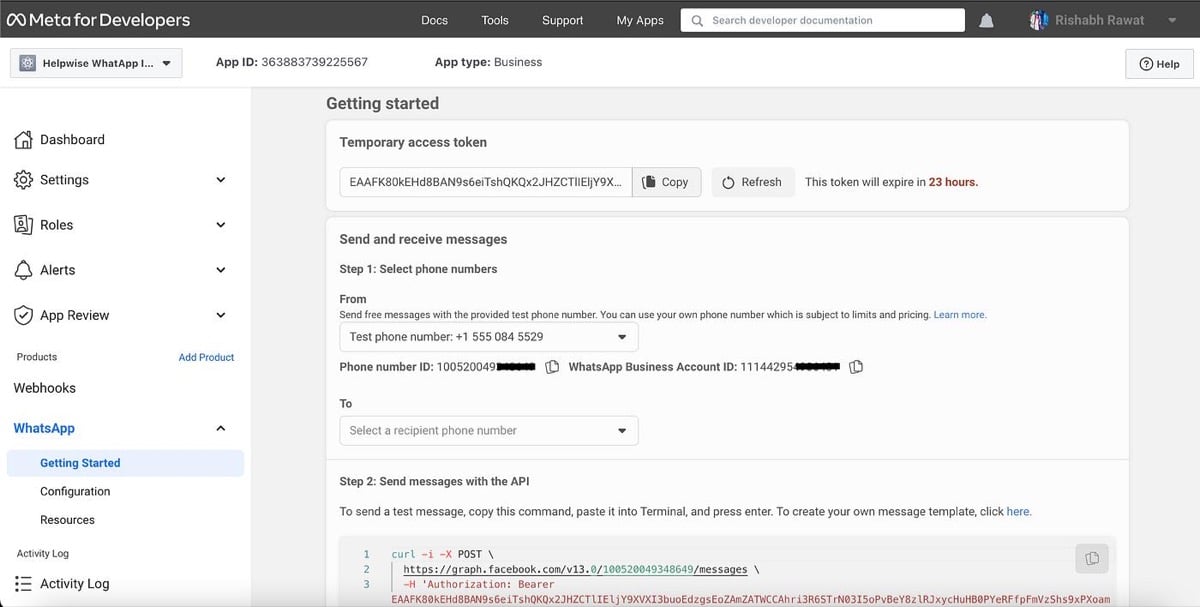 Send the test message straight from that page, or run the command yourself — replace the three placeholders with the values shown:
```bash theme={null}
curl -X POST \
https://graph.facebook.com/v23.0/PHONE_NUMBER_ID/messages \
-H "Authorization: Bearer ACCESS_TOKEN" \
-H "Content-Type: application/json" \
-d '{
"messaging_product": "whatsapp",
"to": "YOUR_NUMBER",
"type": "text",
"text": { "body": "Hello from WhatsApp Cloud API" }
}'
```
In **WhatsApp → API Setup**, scroll to **Add a phone number** and click **Add phone number**.
Send the test message straight from that page, or run the command yourself — replace the three placeholders with the values shown:
```bash theme={null}
curl -X POST \
https://graph.facebook.com/v23.0/PHONE_NUMBER_ID/messages \
-H "Authorization: Bearer ACCESS_TOKEN" \
-H "Content-Type: application/json" \
-d '{
"messaging_product": "whatsapp",
"to": "YOUR_NUMBER",
"type": "text",
"text": { "body": "Hello from WhatsApp Cloud API" }
}'
```
In **WhatsApp → API Setup**, scroll to **Add a phone number** and click **Add phone number**.
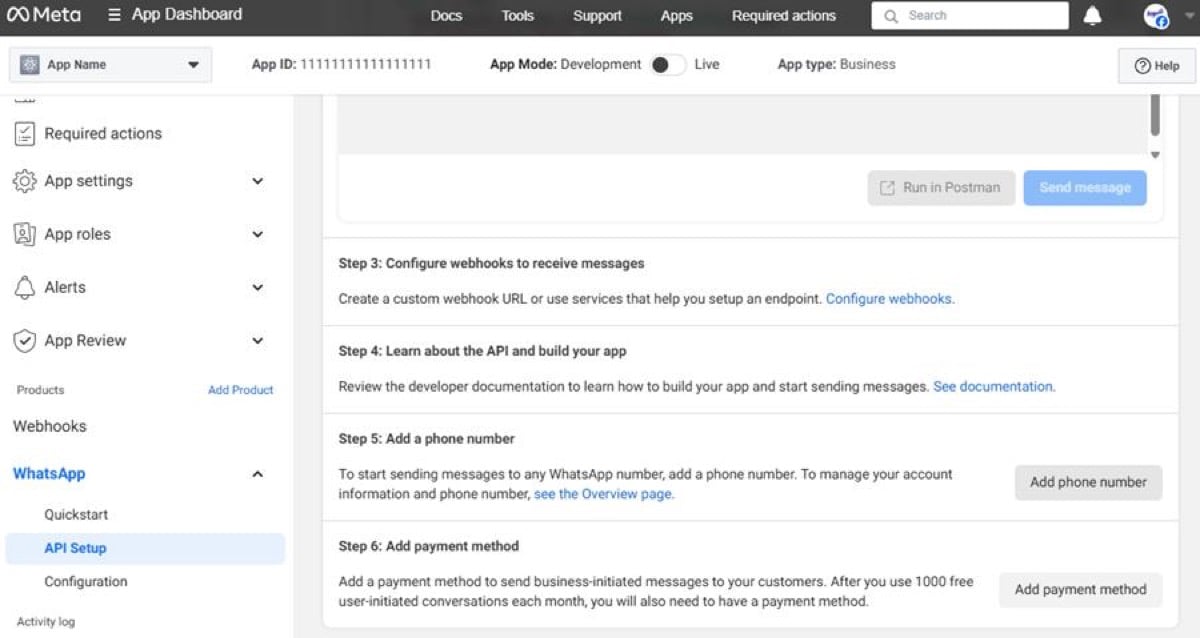 Enter your **business name**, **display name**, **category**, and the **phone number** to register, then choose a verification method.
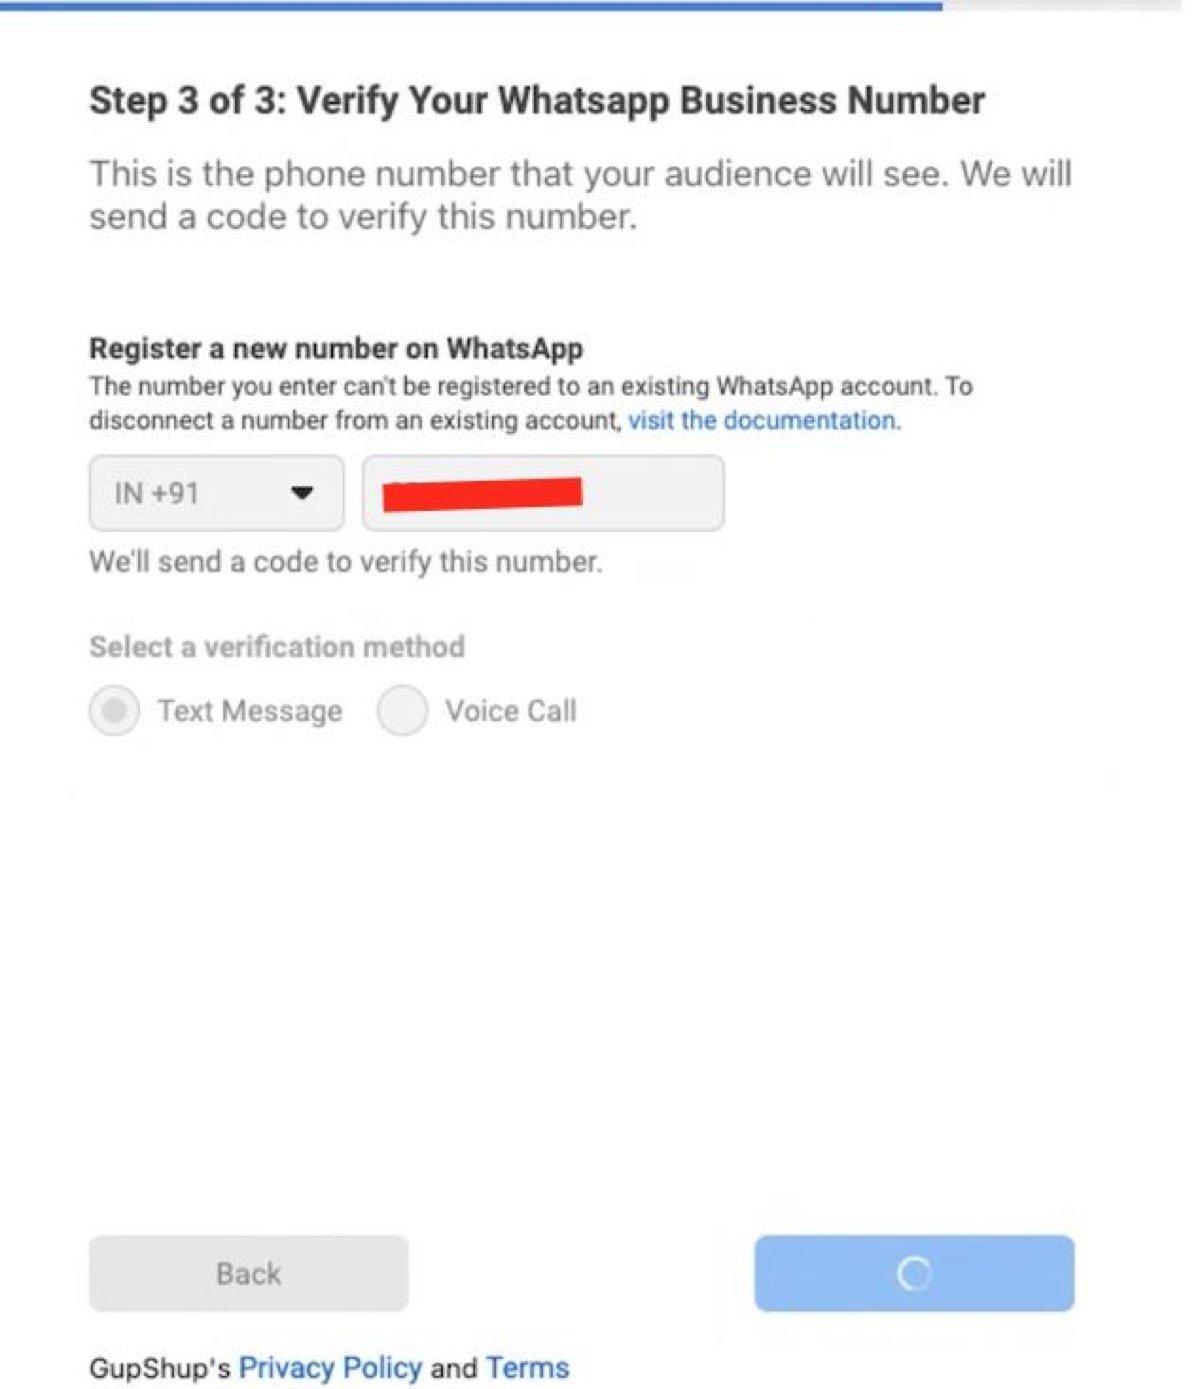 Meta sends a one-time code by SMS or call — enter it to verify the number.
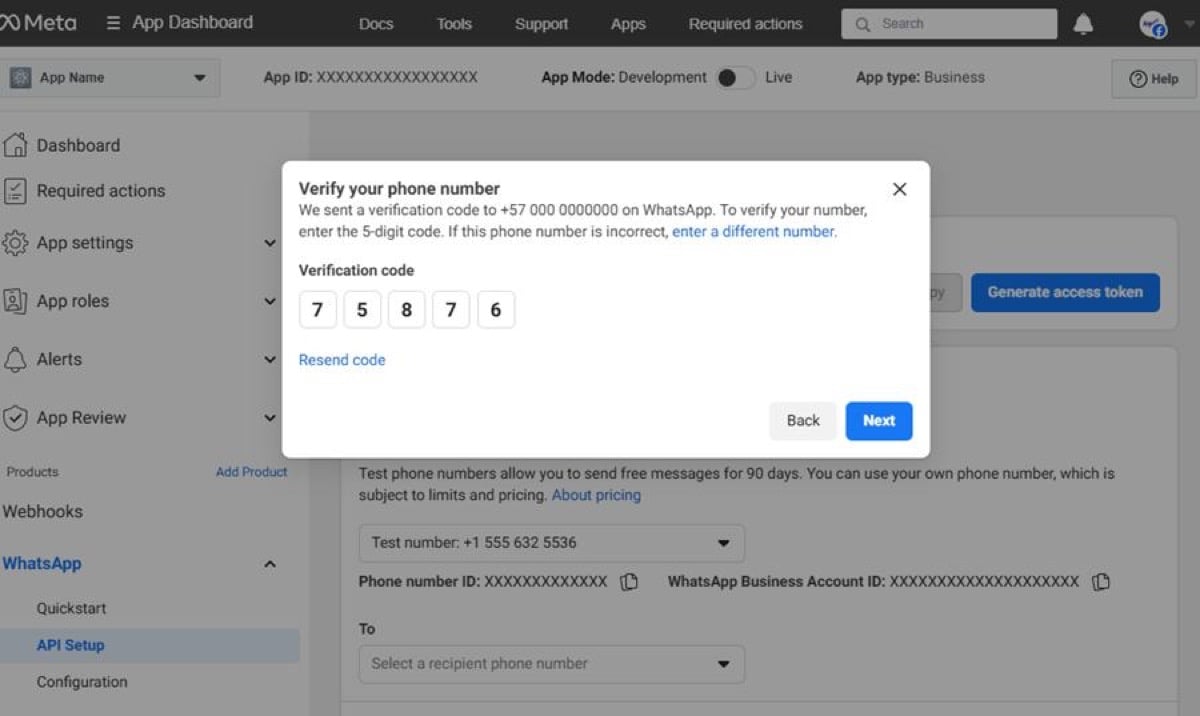 The number must be able to receive an SMS or call, and it **cannot already be connected to another Cloud API**. A number currently on the WhatsApp Business **app** can sometimes be migrated using Meta's coexistence feature.
Once the real number is added, copy these from the **API Setup** page (and from **Business Settings → Accounts → WhatsApp Accounts**). These are exactly what UnleashX asks for:
| Value | Looks like | Where |
| ------------------------------------------ | ------------------- | ----------------------------------------------------------------- |
| **Phone Number ID** | `123456789012345` | API Setup page (the long number, **not** the phone number itself) |
| **WhatsApp Business Account ID (WABA ID)** | `987654321098765` | API Setup page / WhatsApp Accounts |
| **Access Token** | a long token string | API Setup page (temporary) — make it permanent in the next step |
The number must be able to receive an SMS or call, and it **cannot already be connected to another Cloud API**. A number currently on the WhatsApp Business **app** can sometimes be migrated using Meta's coexistence feature.
Once the real number is added, copy these from the **API Setup** page (and from **Business Settings → Accounts → WhatsApp Accounts**). These are exactly what UnleashX asks for:
| Value | Looks like | Where |
| ------------------------------------------ | ------------------- | ----------------------------------------------------------------- |
| **Phone Number ID** | `123456789012345` | API Setup page (the long number, **not** the phone number itself) |
| **WhatsApp Business Account ID (WABA ID)** | `987654321098765` | API Setup page / WhatsApp Accounts |
| **Access Token** | a long token string | API Setup page (temporary) — make it permanent in the next step |
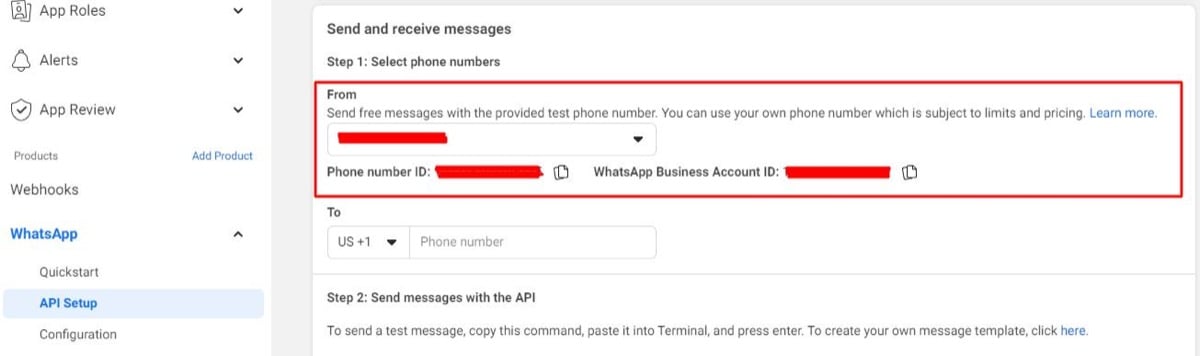 The temporary token expires in about 24 hours, so create a permanent one for production.
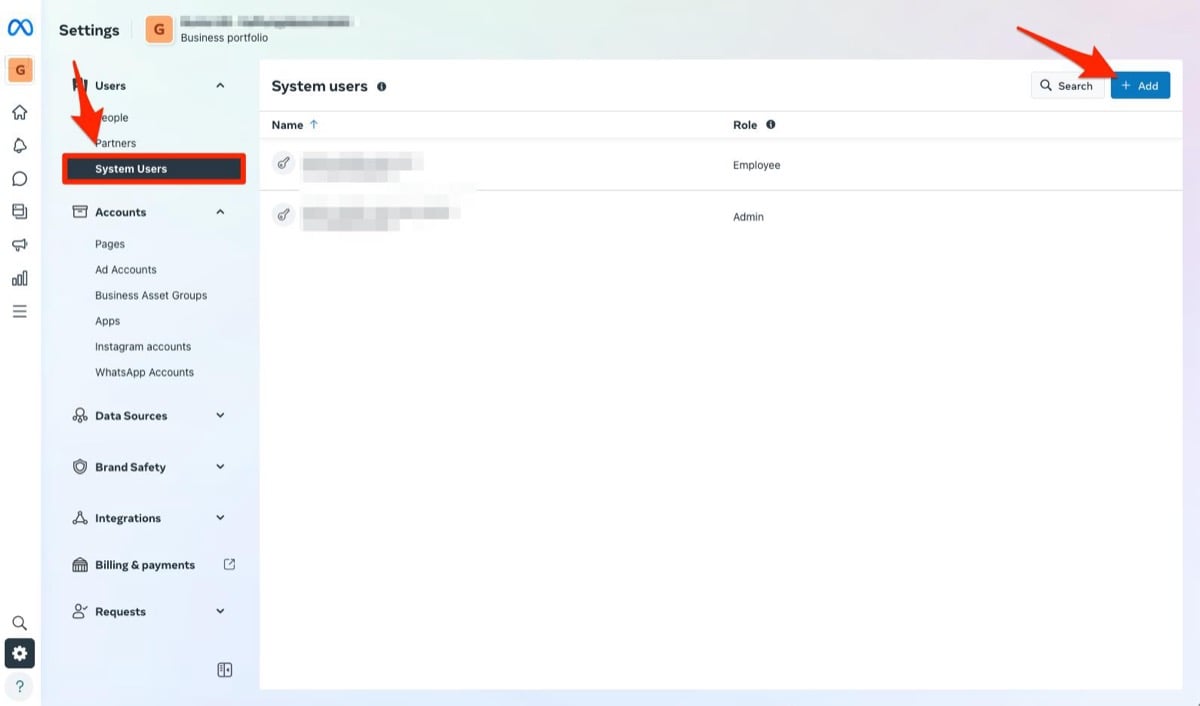
**1. Add a System User.** Go to **Business Settings → Users → System Users** and click **Add**. Name it (e.g. `whatsapp-api`) with the **Admin** role.
The temporary token expires in about 24 hours, so create a permanent one for production.
**1. Add a System User.** Go to **Business Settings → Users → System Users** and click **Add**. Name it (e.g. `whatsapp-api`) with the **Admin** role.
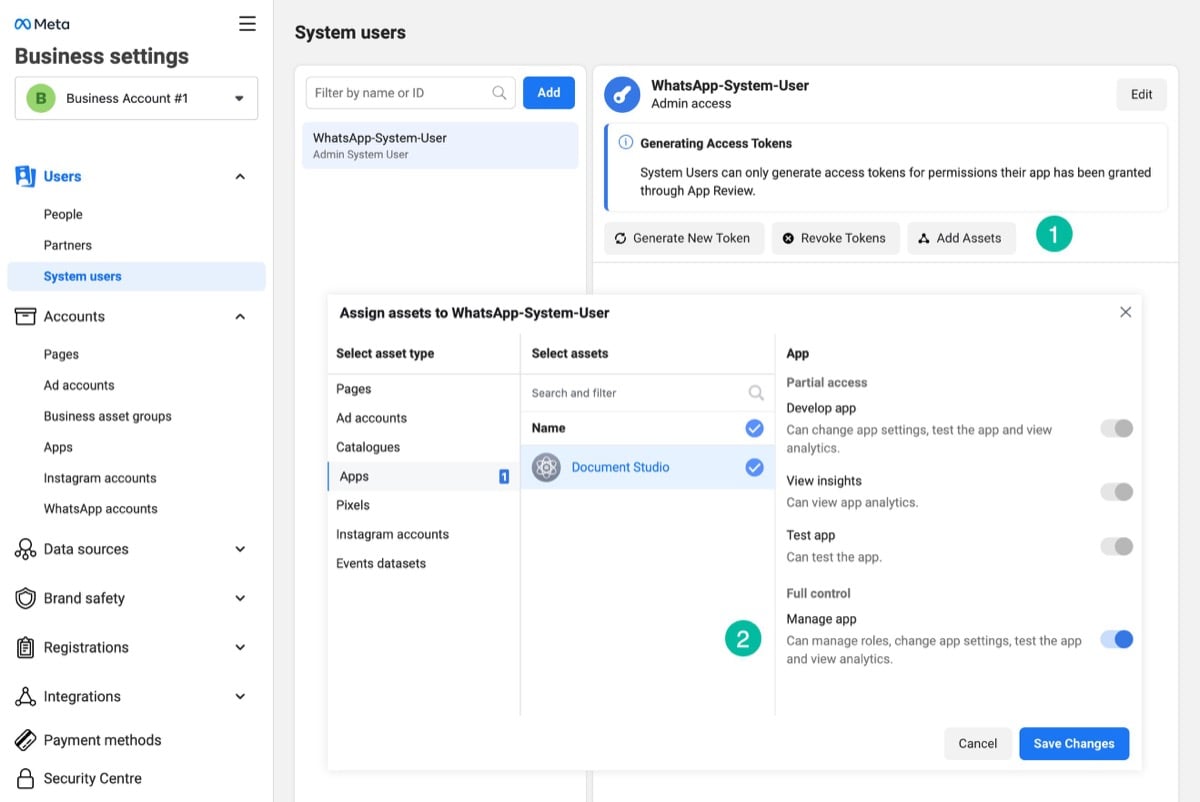
 **2. Assign your app.** Select the system user → **Add Assets → Apps →** pick your app → enable **Manage app** (Full control). Also assign your WhatsApp account under **Accounts → WhatsApp Accounts** and allow **Manage WhatsApp Account**.
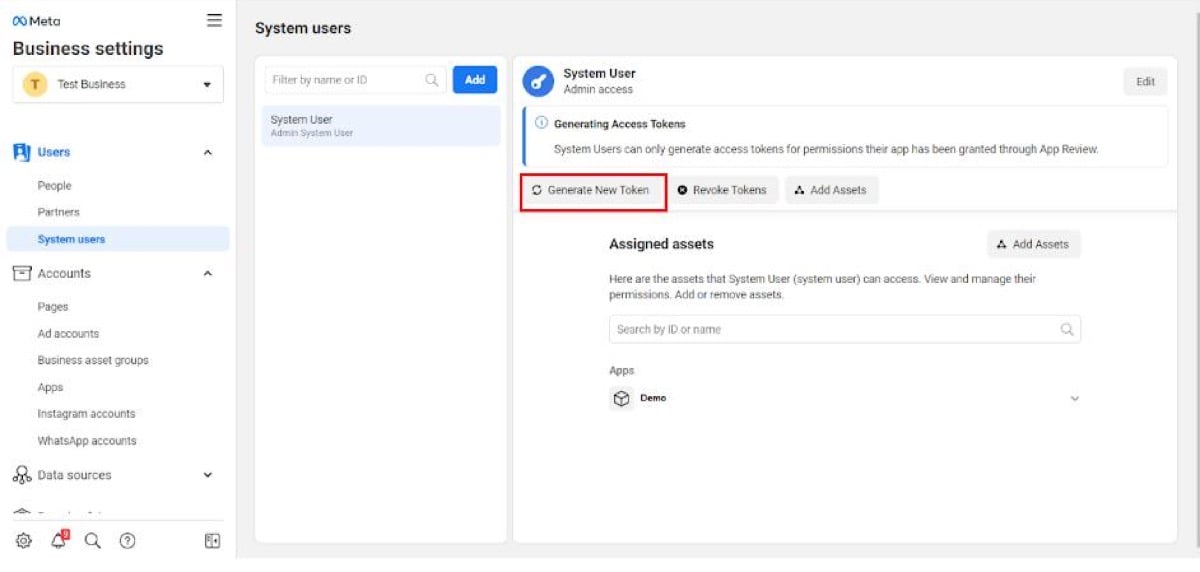
 **3. Generate the token.** Back on the system user, click **Generate New Token** and choose your app.
 **4. Select permissions and generate.** Choose at least:
* `whatsapp_business_messaging`
* `whatsapp_business_management`
**4. Select permissions and generate.** Choose at least:
* `whatsapp_business_messaging`
* `whatsapp_business_management`
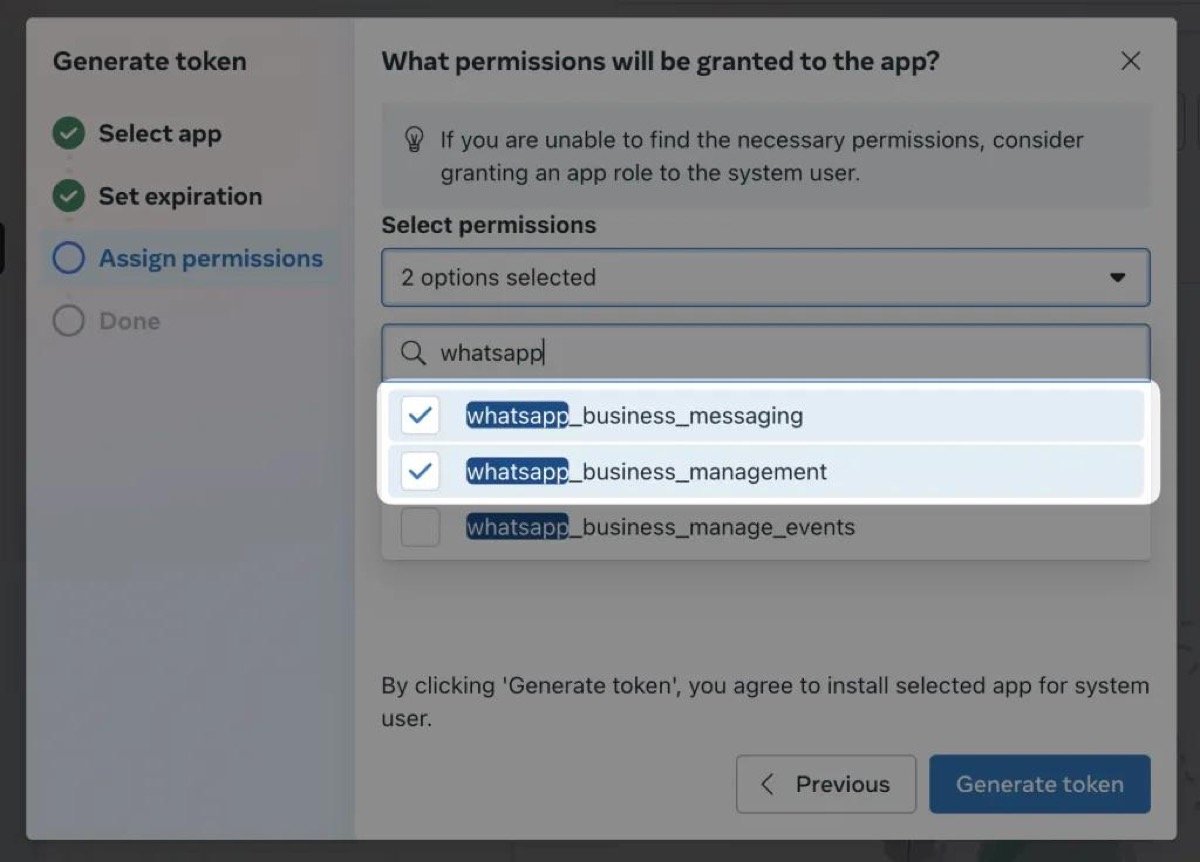 Click **Generate token** and **copy it immediately** — this is your production access token.
The permanent token is shown **once**. Copy it now and store it safely (treat it like a password). If you lose it, regenerate a new one.
**About webhooks (receiving messages):** sending messages needs only the three values above. To *receive* inbound messages into a workflow, use the **Webhook** trigger in [Workflows](/mcp/workflows#webhook) — UnleashX gives you a callback URL to paste into **WhatsApp → Configuration** in Meta. You don't need to build your own server.
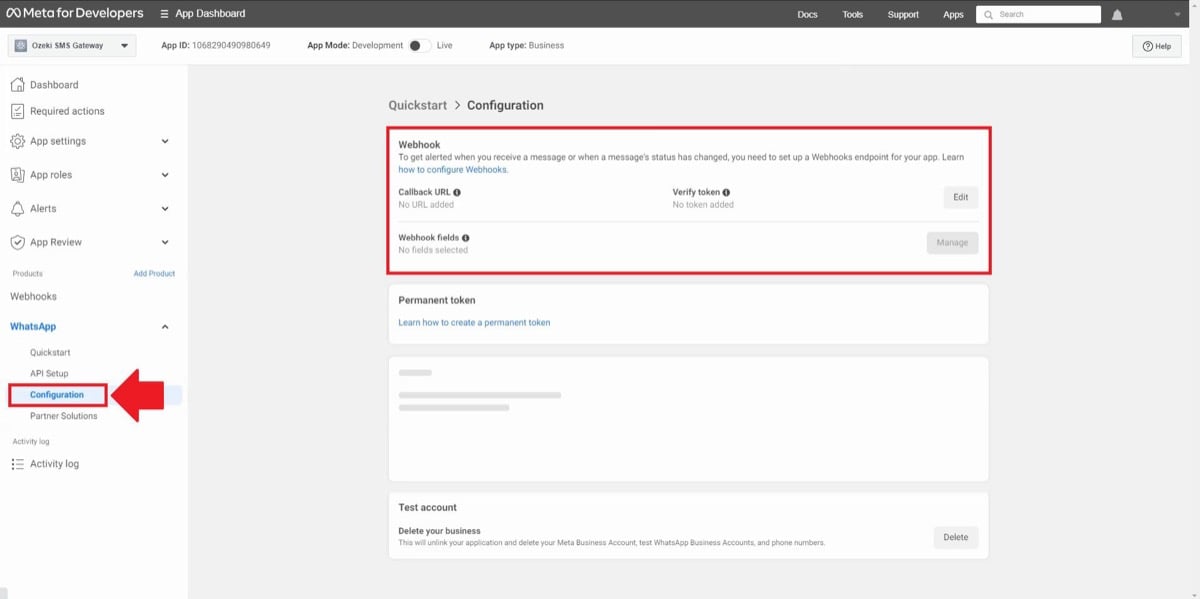
Open **WhatsApp → Configuration** and click **Edit** next to the Webhook callback URL.
Click **Generate token** and **copy it immediately** — this is your production access token.
The permanent token is shown **once**. Copy it now and store it safely (treat it like a password). If you lose it, regenerate a new one.
**About webhooks (receiving messages):** sending messages needs only the three values above. To *receive* inbound messages into a workflow, use the **Webhook** trigger in [Workflows](/mcp/workflows#webhook) — UnleashX gives you a callback URL to paste into **WhatsApp → Configuration** in Meta. You don't need to build your own server.
Open **WhatsApp → Configuration** and click **Edit** next to the Webhook callback URL.
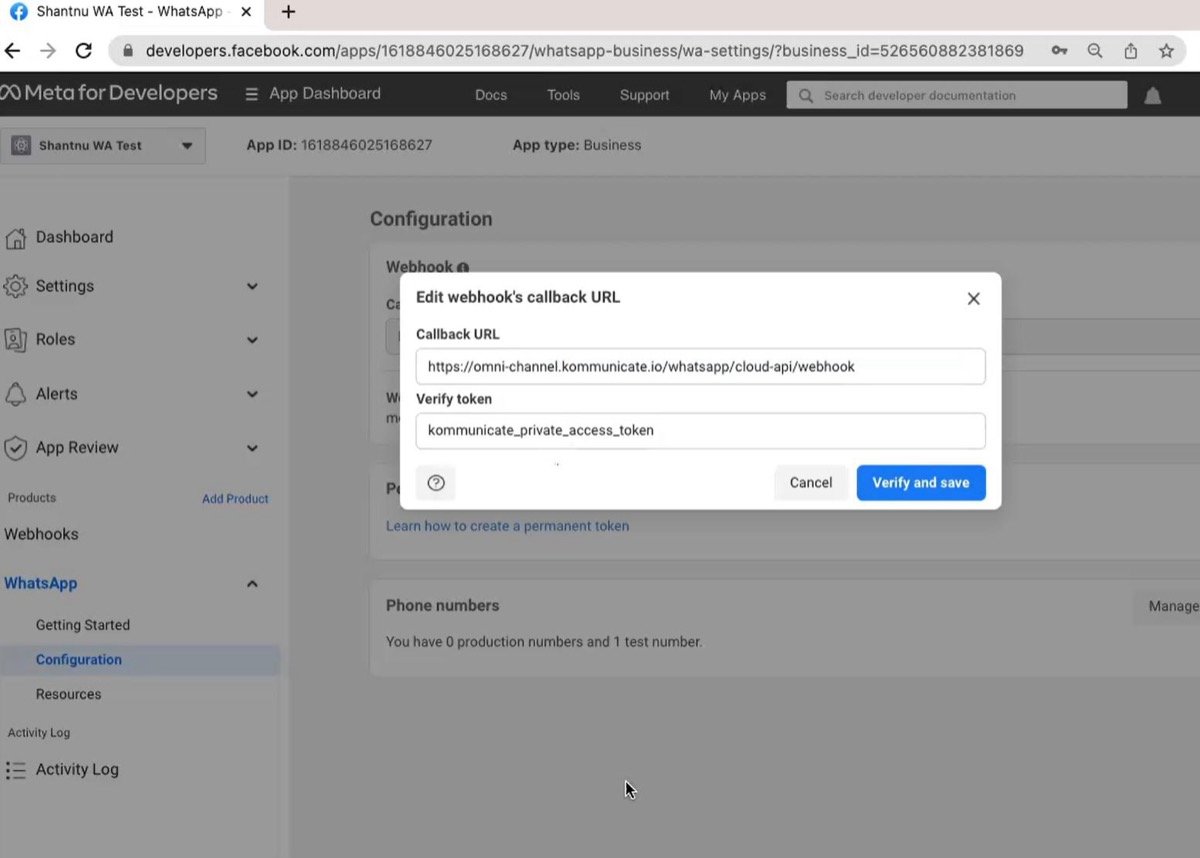
 Paste the callback URL and verify token UnleashX gives you, then click **Verify and save**.
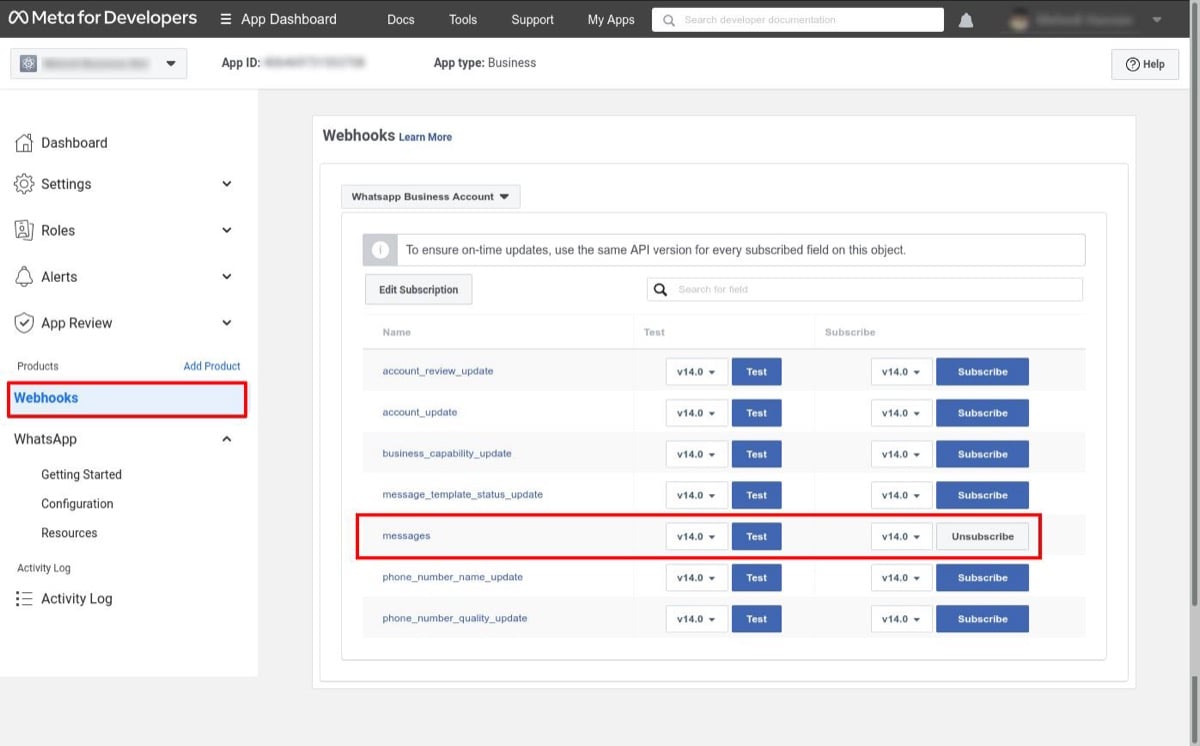
 Finally, subscribe to the **messages** field so inbound messages are delivered to your workflow.
 **Credentials / scopes UnleashX needs and why:**
| Credential / scope | Why UnleashX needs it |
| ----------------------------------------- | ----------------------------------------------------------------- |
| Access token (`access-token`) | Authenticates every call to the WhatsApp Cloud API on your behalf |
| Phone Number ID (`phone-number-id`) | Identifies which business number sends the message |
| WABA ID (`waba-id`) | Lets UnleashX list your approved message templates |
| `whatsapp_business_messaging` permission | Required to send messages and media |
| `whatsapp_business_management` permission | Required to read your message templates |
| `business_management` permission | Lets the system user manage the WhatsApp account |
## 4. Connect on UnleashX
Sign in at [tryunleashx.com](https://www.tryunleashx.com) and open the agent you want to connect.
Open **Data Connectors** inside the agent.
Locate **WhatsApp Business** and click **Connect** / **Add** / **Configure**.
Enter your **access token**, **Phone Number ID**, and **WABA ID** from Section 3, then save.
The connector shows a **Connected** badge once your credentials validate. You're ready to send.
### Use WhatsApp Business in a Workflow
Once connected, you can add **WhatsApp Business** to any automation from the **Workflows** builder. Its triggers and tools appear in the Apps panel, marked with an **MCP** badge.
Open **Workflows → New Workflow**. On the canvas, click **+ Add Trigger** (or the **+** below any node) to add a step.
**Credentials / scopes UnleashX needs and why:**
| Credential / scope | Why UnleashX needs it |
| ----------------------------------------- | ----------------------------------------------------------------- |
| Access token (`access-token`) | Authenticates every call to the WhatsApp Cloud API on your behalf |
| Phone Number ID (`phone-number-id`) | Identifies which business number sends the message |
| WABA ID (`waba-id`) | Lets UnleashX list your approved message templates |
| `whatsapp_business_messaging` permission | Required to send messages and media |
| `whatsapp_business_management` permission | Required to read your message templates |
| `business_management` permission | Lets the system user manage the WhatsApp account |
## 4. Connect on UnleashX
Sign in at [tryunleashx.com](https://www.tryunleashx.com) and open the agent you want to connect.
Open **Data Connectors** inside the agent.
Locate **WhatsApp Business** and click **Connect** / **Add** / **Configure**.
Enter your **access token**, **Phone Number ID**, and **WABA ID** from Section 3, then save.
The connector shows a **Connected** badge once your credentials validate. You're ready to send.
### Use WhatsApp Business in a Workflow
Once connected, you can add **WhatsApp Business** to any automation from the **Workflows** builder. Its triggers and tools appear in the Apps panel, marked with an **MCP** badge.
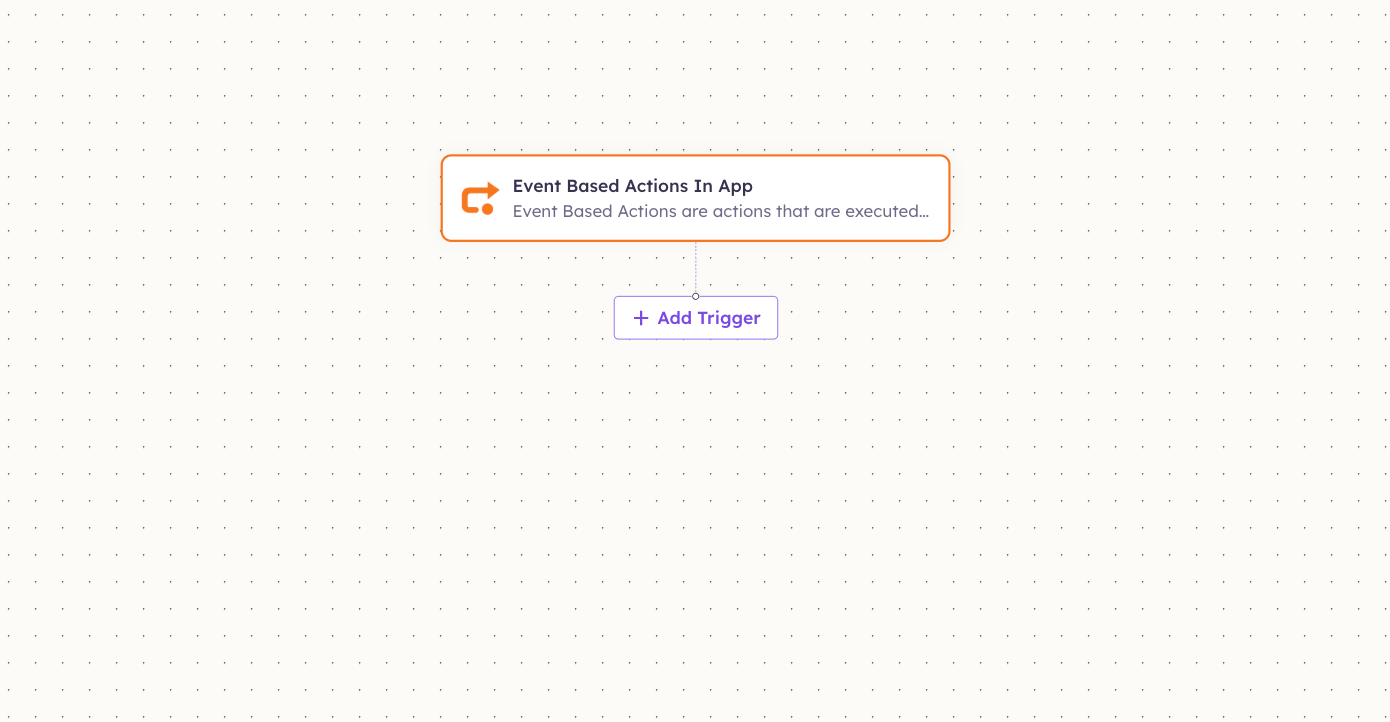
Open **Workflows → New Workflow**. On the canvas, click **+ Add Trigger** (or the **+** below any node) to add a step.
 In the **Paths** panel, open the **Apps** tab and select **WhatsApp Business**. Use the search box if you have many connectors.
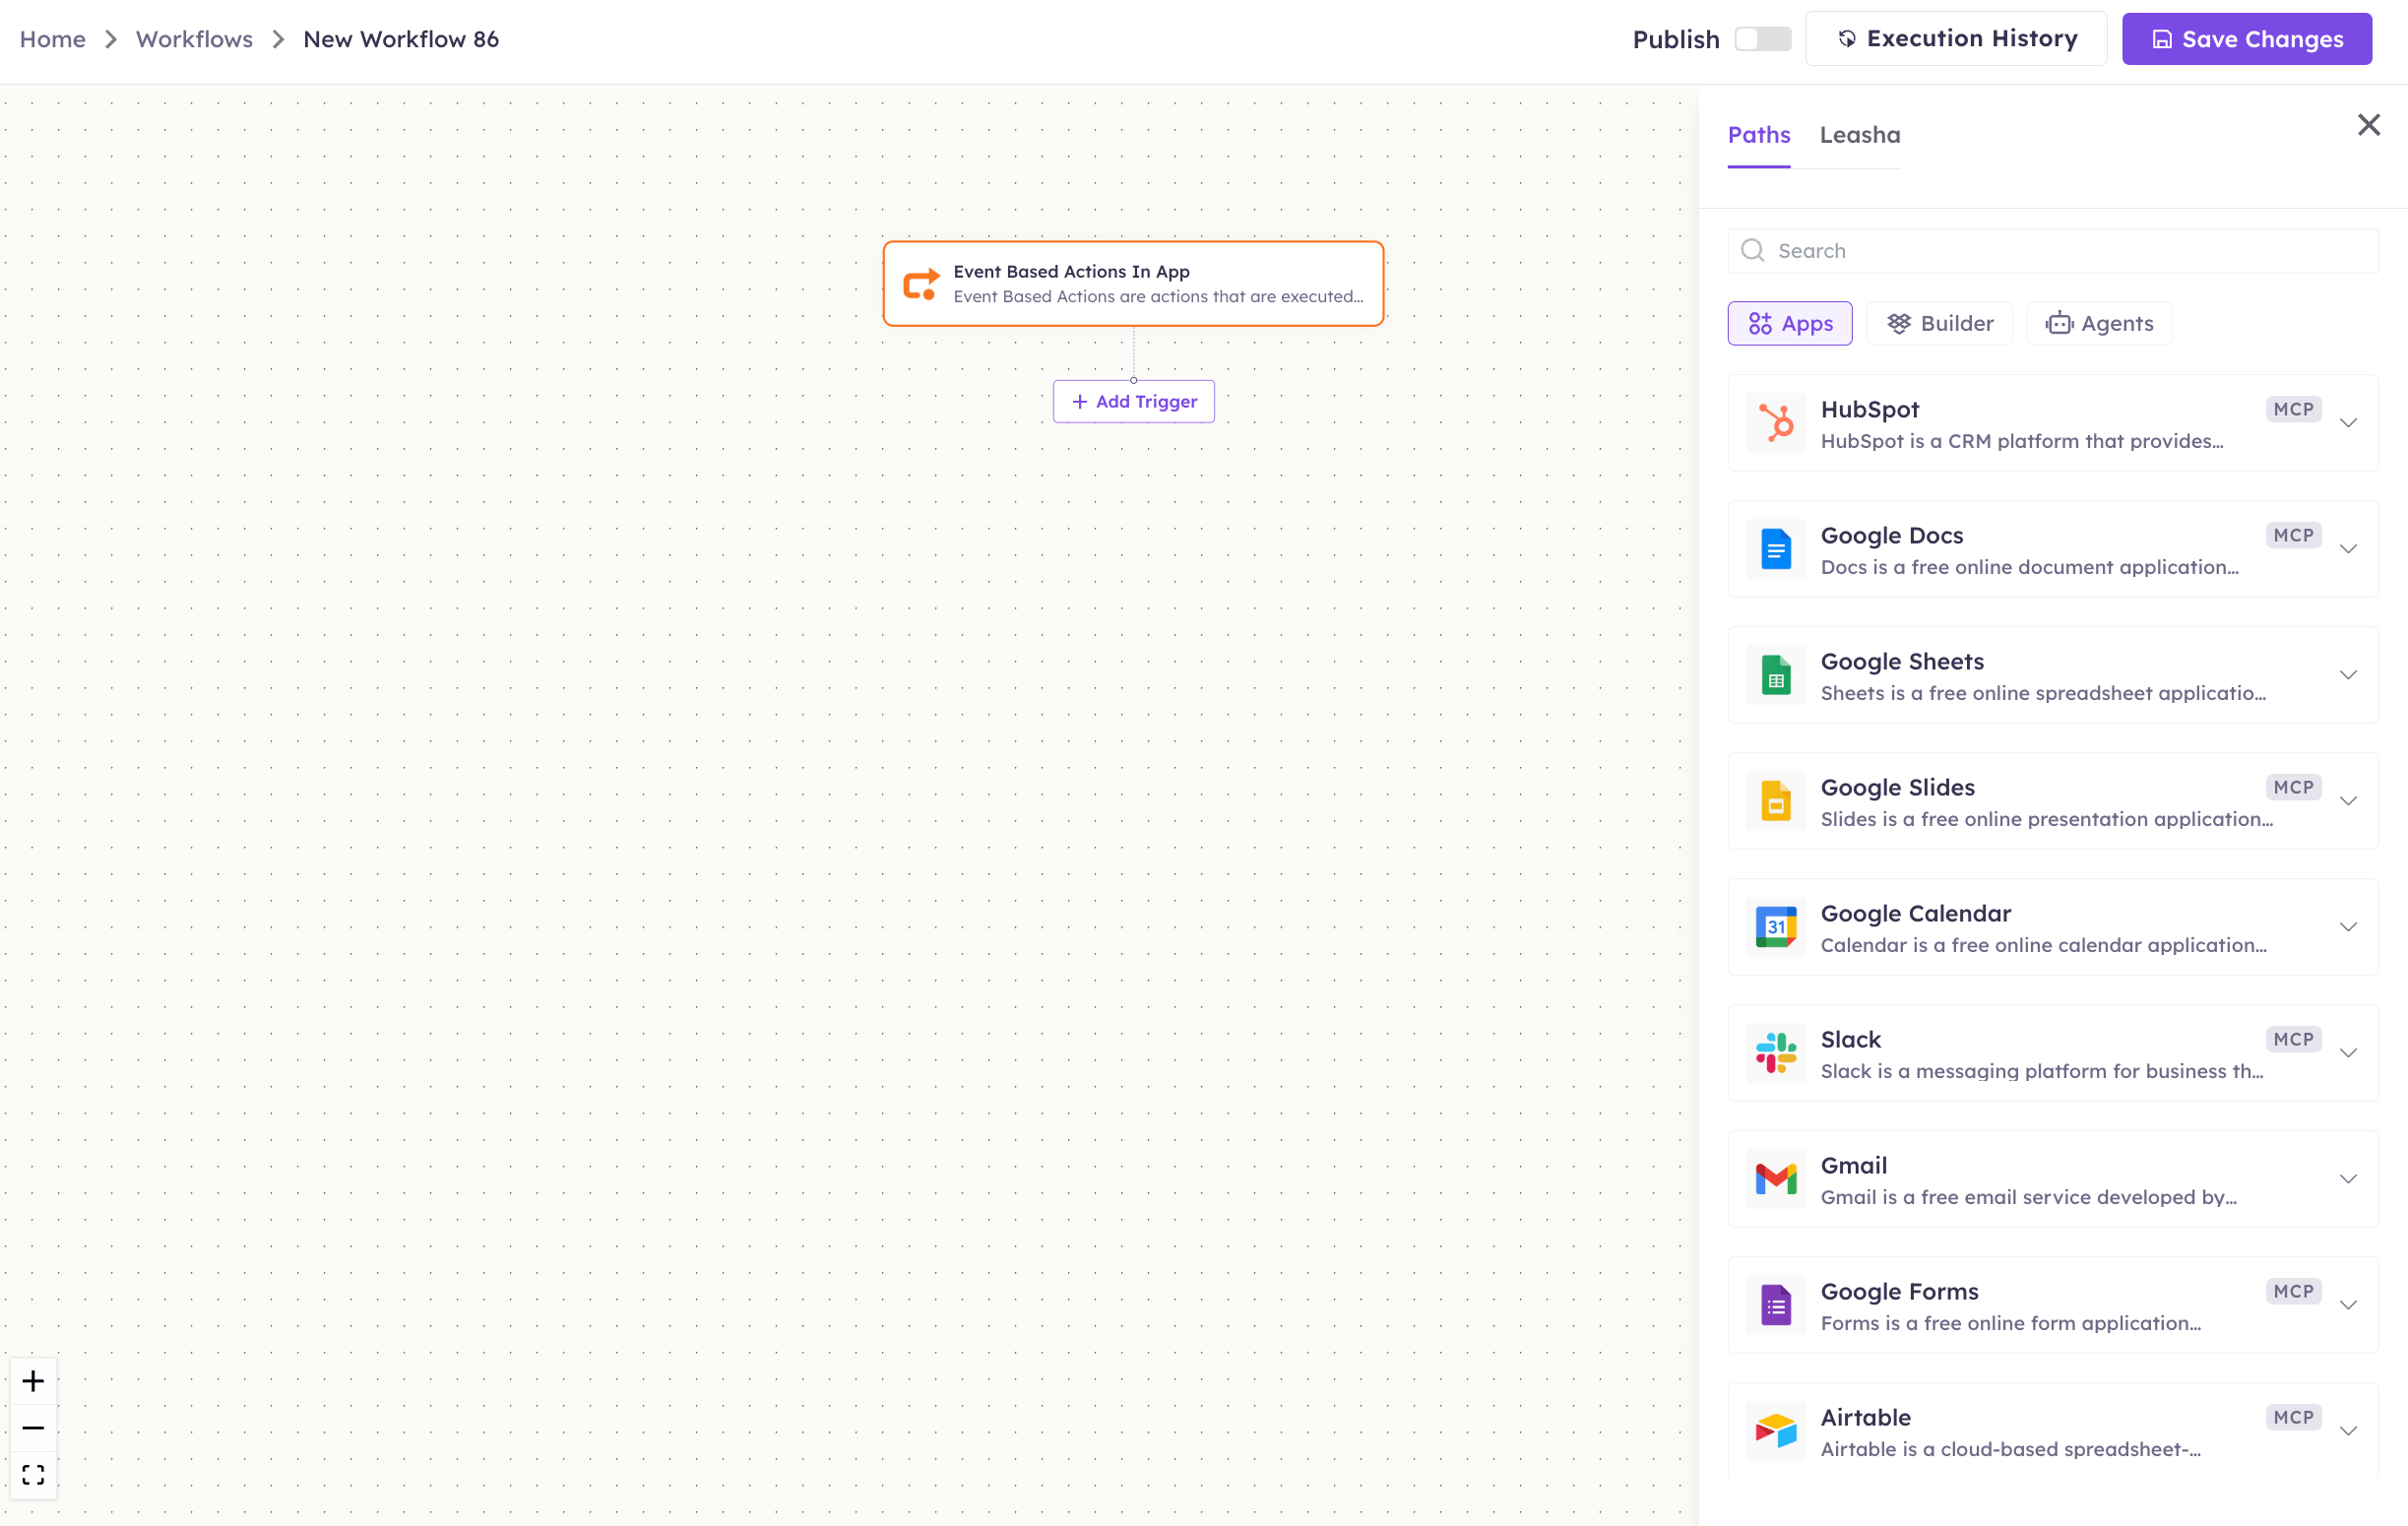 Pick the trigger or action you want. Configure its fields — required fields are marked with a red asterisk (\*).
Under **Selected account**, choose an already-connected account, or click **Add Account** to connect one now.
Fill in the remaining fields and click **Save**. Use **Test** to verify the step, then toggle **Publish** when the workflow is ready.
The steps are the same for every connector. For the full workflow builder guide, see [Using MCP in Workflows](/mcp/workflows).
## 5. Available tools
| Tool | What it does | Changes data? |
| --------------------- | -------------------------------------------------------------- | ------------- |
| Send Message | Send a plain WhatsApp text message | ✏️ Yes |
| List Templates | List your approved message templates | No |
| Send Template | Send an approved template message with optional variables | ✏️ Yes |
| Send Image URL | Send an image by public URL (optional caption) | ✏️ Yes |
| Send Document | Send a document by uploaded media ID | ✏️ Yes |
| Send Document URL | Send a document by public URL | ✏️ Yes |
| Send Audio | Send an audio/voice message by media ID | ✏️ Yes |
| Send Voice Message | Download audio from a URL, upload it, and send as a voice note | ✏️ Yes |
| Send Video | Send a video by media ID (optional caption) | ✏️ Yes |
| Mark Read | Mark an inbound message as read | ✏️ Yes |
| Get Insurance Detail | Get car insurance quotes for a vehicle registration number | No |
| Zimyo Employee Detail | Look up Zimyo employee details by phone number | No |
Get Insurance Detail and Zimyo Employee Detail are helper lookups bundled into this server for specific business workflows (insurance quoting and HR employee lookup). They don't send WhatsApp messages themselves.
## 6. Example usage
**"Text +91 98765 43210 their order #4521 has shipped."**
Behind the scenes: Send Message (UnleashX normalizes the number and posts to the Cloud API).
**"Send the 'appointment\_reminder' template to this customer for 3 PM tomorrow."**
Behind the scenes: List Templates (confirm the template) → Send Template (with the time as a variable).
## 7. Permissions & data access
**UnleashX CAN:**
* Send text, template, image, document, audio/voice, and video messages from your business number.
* List your approved message templates.
* Mark inbound messages as read.
**UnleashX CANNOT:**
* Send free-form messages outside WhatsApp's 24-hour customer service window — those require an approved template.
* Create or approve templates (that happens in the Meta dashboard).
* Message numbers that haven't opted in, or bypass Meta's messaging policies.
* Access your Meta account settings or billing.
**How to disconnect:** In UnleashX, open **Data Connectors → WhatsApp Business → Disconnect**. To fully cut access, also revoke or regenerate the access token in **Meta → Business Settings → System Users**. Disconnecting takes effect immediately.
## 8. Troubleshooting
| Problem | What it means | How to fix it |
| --------------------------------- | -------------------------------------------------------------- | ---------------------------------------------------------------------------------------- |
| 401 — No access token found | The access token is missing, malformed, or not sent | Reconnect and re-enter a valid `access-token` (and re-check it hasn't expired) |
| 401 — No Phone Number ID | The `phone-number-id` is missing | Add your Phone Number ID from the Meta API Setup page |
| Token expired (Graph API error) | A temporary token expired (\~24h) | Generate a permanent System User token and reconnect |
| 403 / permission error | The token lacks `whatsapp_business_messaging` or `_management` | Add the missing permission to the System User and regenerate the token |
| Template not found / not approved | The template name/language is wrong or not yet approved | Use List Templates to confirm the exact name and language; approve it in Meta if pending |
For general connector issues, see [/mcp/integrations](/mcp/integrations).
## 9. Frequently asked questions
**Do I need approved templates to message customers?**
Yes — to start a conversation or message outside the 24-hour service window, WhatsApp requires a pre-approved template. Plain text messages only work within an open customer service window.
**Why does my access token keep expiring?**
You're likely using a temporary token. Create a permanent **System User** access token in Meta Business Settings for production use.
**Is my customer message data stored by UnleashX?**
UnleashX sends messages on demand through Meta's API. Inbound webhook events may be logged for delivery and analytics; outbound message content is not retained beyond what's needed to complete the request.
**Can I use my own phone number?**
You use the business number registered to your WhatsApp Business Account in Meta. The `phone-number-id` you provide tells UnleashX which number to send from.
## 10. References
* WhatsApp Cloud API documentation: [https://developers.facebook.com/docs/whatsapp/cloud-api](https://developers.facebook.com/docs/whatsapp/cloud-api)
* Get started / API Setup: [https://developers.facebook.com/docs/whatsapp/cloud-api/get-started](https://developers.facebook.com/docs/whatsapp/cloud-api/get-started)
* Message templates guide: [https://developers.facebook.com/docs/whatsapp/business-management-api/message-templates](https://developers.facebook.com/docs/whatsapp/business-management-api/message-templates)
* System User access tokens: [https://developers.facebook.com/docs/whatsapp/business-management-api/get-started](https://developers.facebook.com/docs/whatsapp/business-management-api/get-started)
Pick the trigger or action you want. Configure its fields — required fields are marked with a red asterisk (\*).
Under **Selected account**, choose an already-connected account, or click **Add Account** to connect one now.
Fill in the remaining fields and click **Save**. Use **Test** to verify the step, then toggle **Publish** when the workflow is ready.
The steps are the same for every connector. For the full workflow builder guide, see [Using MCP in Workflows](/mcp/workflows).
## 5. Available tools
| Tool | What it does | Changes data? |
| --------------------- | -------------------------------------------------------------- | ------------- |
| Send Message | Send a plain WhatsApp text message | ✏️ Yes |
| List Templates | List your approved message templates | No |
| Send Template | Send an approved template message with optional variables | ✏️ Yes |
| Send Image URL | Send an image by public URL (optional caption) | ✏️ Yes |
| Send Document | Send a document by uploaded media ID | ✏️ Yes |
| Send Document URL | Send a document by public URL | ✏️ Yes |
| Send Audio | Send an audio/voice message by media ID | ✏️ Yes |
| Send Voice Message | Download audio from a URL, upload it, and send as a voice note | ✏️ Yes |
| Send Video | Send a video by media ID (optional caption) | ✏️ Yes |
| Mark Read | Mark an inbound message as read | ✏️ Yes |
| Get Insurance Detail | Get car insurance quotes for a vehicle registration number | No |
| Zimyo Employee Detail | Look up Zimyo employee details by phone number | No |
Get Insurance Detail and Zimyo Employee Detail are helper lookups bundled into this server for specific business workflows (insurance quoting and HR employee lookup). They don't send WhatsApp messages themselves.
## 6. Example usage
**"Text +91 98765 43210 their order #4521 has shipped."**
Behind the scenes: Send Message (UnleashX normalizes the number and posts to the Cloud API).
**"Send the 'appointment\_reminder' template to this customer for 3 PM tomorrow."**
Behind the scenes: List Templates (confirm the template) → Send Template (with the time as a variable).
## 7. Permissions & data access
**UnleashX CAN:**
* Send text, template, image, document, audio/voice, and video messages from your business number.
* List your approved message templates.
* Mark inbound messages as read.
**UnleashX CANNOT:**
* Send free-form messages outside WhatsApp's 24-hour customer service window — those require an approved template.
* Create or approve templates (that happens in the Meta dashboard).
* Message numbers that haven't opted in, or bypass Meta's messaging policies.
* Access your Meta account settings or billing.
**How to disconnect:** In UnleashX, open **Data Connectors → WhatsApp Business → Disconnect**. To fully cut access, also revoke or regenerate the access token in **Meta → Business Settings → System Users**. Disconnecting takes effect immediately.
## 8. Troubleshooting
| Problem | What it means | How to fix it |
| --------------------------------- | -------------------------------------------------------------- | ---------------------------------------------------------------------------------------- |
| 401 — No access token found | The access token is missing, malformed, or not sent | Reconnect and re-enter a valid `access-token` (and re-check it hasn't expired) |
| 401 — No Phone Number ID | The `phone-number-id` is missing | Add your Phone Number ID from the Meta API Setup page |
| Token expired (Graph API error) | A temporary token expired (\~24h) | Generate a permanent System User token and reconnect |
| 403 / permission error | The token lacks `whatsapp_business_messaging` or `_management` | Add the missing permission to the System User and regenerate the token |
| Template not found / not approved | The template name/language is wrong or not yet approved | Use List Templates to confirm the exact name and language; approve it in Meta if pending |
For general connector issues, see [/mcp/integrations](/mcp/integrations).
## 9. Frequently asked questions
**Do I need approved templates to message customers?**
Yes — to start a conversation or message outside the 24-hour service window, WhatsApp requires a pre-approved template. Plain text messages only work within an open customer service window.
**Why does my access token keep expiring?**
You're likely using a temporary token. Create a permanent **System User** access token in Meta Business Settings for production use.
**Is my customer message data stored by UnleashX?**
UnleashX sends messages on demand through Meta's API. Inbound webhook events may be logged for delivery and analytics; outbound message content is not retained beyond what's needed to complete the request.
**Can I use my own phone number?**
You use the business number registered to your WhatsApp Business Account in Meta. The `phone-number-id` you provide tells UnleashX which number to send from.
## 10. References
* WhatsApp Cloud API documentation: [https://developers.facebook.com/docs/whatsapp/cloud-api](https://developers.facebook.com/docs/whatsapp/cloud-api)
* Get started / API Setup: [https://developers.facebook.com/docs/whatsapp/cloud-api/get-started](https://developers.facebook.com/docs/whatsapp/cloud-api/get-started)
* Message templates guide: [https://developers.facebook.com/docs/whatsapp/business-management-api/message-templates](https://developers.facebook.com/docs/whatsapp/business-management-api/message-templates)
* System User access tokens: [https://developers.facebook.com/docs/whatsapp/business-management-api/get-started](https://developers.facebook.com/docs/whatsapp/business-management-api/get-started)